Bibliographic records, which include item data, can be batch loaded through the staff client by using the MARC Batch Import interface. This is a good option for libraries that want to have “On Order” items in the catalog, but do not want to use the accounting functions of Acquisitions.
Contact NOBLE if you would like to do this. NOBLE will need to set up one or more of the following for your library.
Defaults that can be set for loading item data:
- Vandelay Generate Default Barcodes – Evergreen automatically generates a unique barcode. Required if barcodes are not present in the item data.
- Vandelay Default Barcode Prefix – System default is “VAN” but you can use something else. The library short name is a good option. This prefix will be added to the beginning of the generated barcode.
- Vandelay General Default Call Numbers – Required, unless it is provided in the item data.
- Vandelay Default Call Number Prefix – Optional
- Vandelay Default Copy Location – Required, unless it is provided in the item data.
- Vandelay Default Circulation Modifier – Required, unless it is provided in the item data.
Data that needs to be in the bib record to create an item:
An 852 field is used to hold the item data that will create an item record during the loading process. “Grids” can be set up on Ingram’s and Baker & Taylor’s sites to create 852 fields. See your vendor’s documentation on setting up grids.
852 Subfields:
- p – barcode – required if loading barcodes rather than having Evergreen generate them.
- j – call number – required if no default setting.
- b – library location – required – Example: GLO
- g – circ modifier – requied if no default setting.
- y – price – optional
- c – copy location – required if no default setting.
- z – status – required value of “On order” – Case is important.
Sample 852 fields:
=852 \\$bGLO$cAdult On Order$gbook$jOn Order$y15.49$zOn order
=852 \\$bMAR$y14.95$zOn order
=852 \\$bWAK$cChildren’s On Order$y29.95$gdvd$zOn order
The Process
- Go to MARC Batch Import/Export(Original) either from the Portal Page or from the Cataloging menu.
- Set the upload options as below. You can create a new queue with a unique queue name or you can add to an existing queue. Queues can be deleted once you have completed the load.
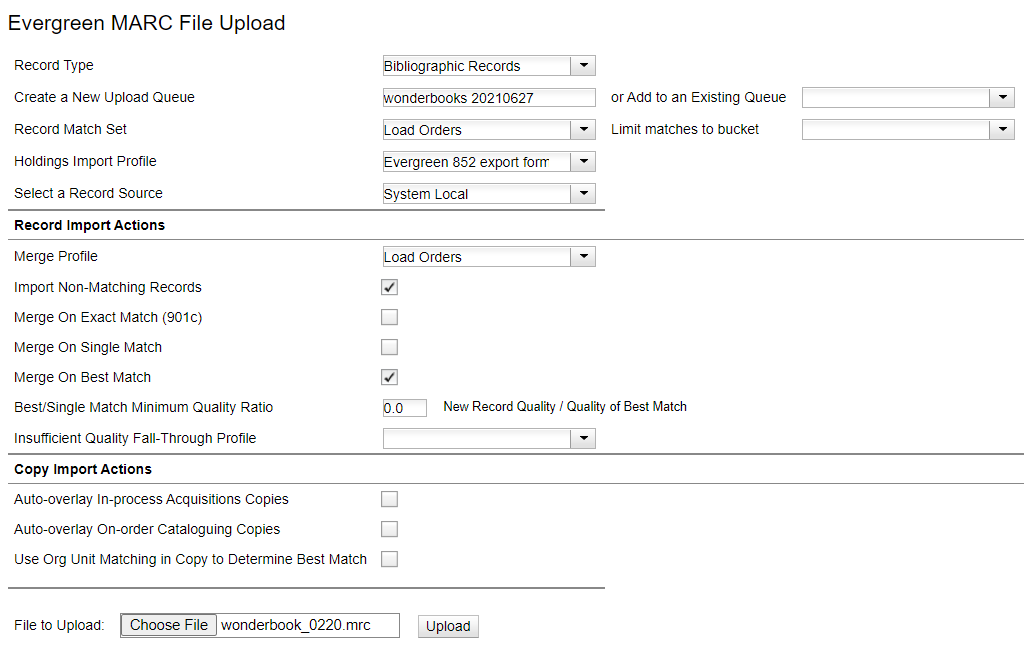
MARC File Import Settings - Click Choose File and select the file you want to upload.
- Click Upload
- A progress bar will appear.
- The record Queue will appear. NOTE: Larger file may stall. If this happens, click on the Inspect Queue tab and then on the queue name. You will be able to see the status of the load by looking at the Queue Summary. “Records in Queue” should equal “Records Imported,” “Items in Queue” should match Items Imported.
- If there were no errors, you can delete the queue by clicking on Delete Queue in the left hand column.
- To load another file, click on Import Records in the menu bar.
NOTE: Files are best kept to 200 records and under.